Find and Use the Right CSI Shim for Your Horse

Horses are just like us — they’re not physically perfect.
Horses are just like us — they’re not physically perfect. Some are left leaded, some right; some are born with high withers, some are born to be round; some are wide, some are narrow. And to complicate matters, our riding habits and saddles can create anatomy issues that make saddle fit difficult.
Although 95% of horses do not need shims, there are a few that do. If your horse has “pockets” behind his withers or if he has a sway back, a shim can help your saddle fit and work to the best of maximum.
Learn more below, and call us 1-660-638-4(CSI) 4274, and we’ll help you choose the right shim for your horse(s).
Using Shims to Affect Your Saddle Fit
Before adding a shim to your saddle pad, you need to know that shims are only TEMPORARY solutions and should be used only when necessary and as part of an overall rehab program. You should re-access your shims every few rides.
The majority of horses out there don’t need shims with the CSI Saddle Pad system. The CSI Flex-Plate® is very, very effective at resolving minor anatomy issues. However, there are some conditions which can benefit from having shims.
Shims an be the solution to the more dramatic versions of the anatomy conditions below. If you choose to shim, be sure to keep these tips in mind:
- Shim using the thinnest shim to correct the issue. Do not over shim as this could cause other problems.
- Check shims OFTEN. Your horse’s body changes frequently, keep checking the shim and the fit of your saddle and pad to make sure you still need the shim.
- Remove the shims if you ride a different horse and check the shims if you change saddles.
- When you add a shim to your saddle pad, what you’re really doing is filling in with foam or felt or other material where the horse should naturally have muscle. Keep this principle in mind at all times when you’re cutting your shims.
Adding a Shim to Your CSI Saddle Pad
Fitting Your Shim for Your Horse and Your CSI Saddle Pad

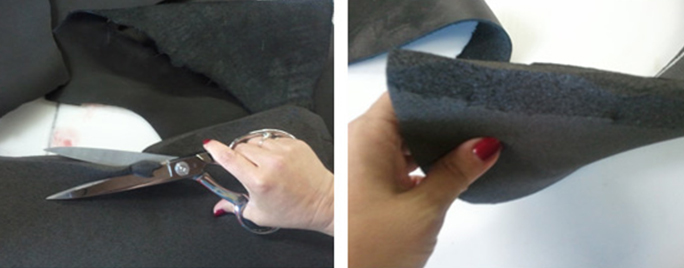
- Evaluate the back with no saddle pad, saddle or shim (see the 3 Three Common Anatomy Issues below to determine which issue may be present in your horse)
- Mark the cut line. You are marking to fill in the negative space
- Cut Shim
This demonstration is an in depth look at the shimming process for a swaybacked horse.
Adding Your Shim to Your CSI Saddle Pad
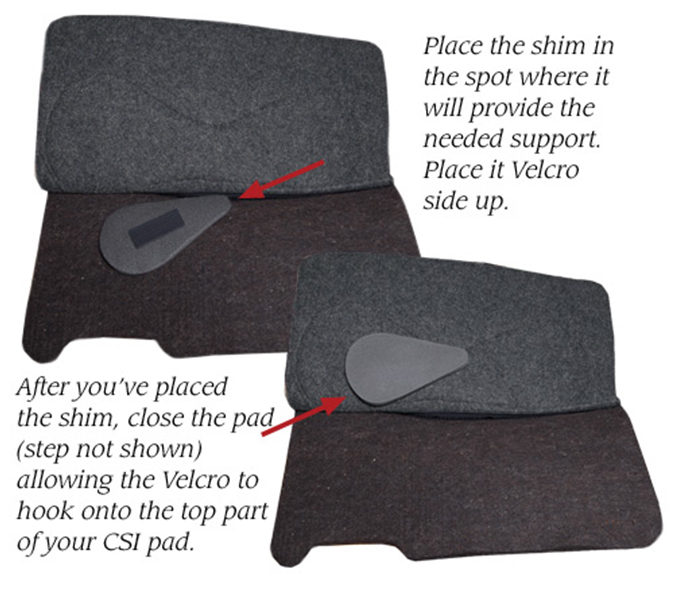
- Apply the Velcro to the top-side of the shim – this makes it removable and re-position-able.
- Place your cut shim in the spot where it will provide the needed support for your horse. The shim will go between the saddle pad and the saddle pad liner, with Velcro side facing up.
- After you’ve placed your shim, close the saddle pad (step not shown), allowing the Velcro to hook onto the top part of your CSI Saddle Pad.
Beveling Your Shims for More Comfort
Thicker shims should be beveled for your horse’s comfort. Just cut the edge of the shim at an angle to create a bevel or slope.
Three Common Anatomy Issues that Affect Saddle Fit

Shoulder Pockets
A common anatomy issues a horse can experience is shoulder pockets. This condition can caused by poor saddle fit, it can be a natural condition or it may be a transitional body change during the aging process.
No matter how shoulder pockets occur, horses with this condition can benefit greatly from the dispersion capability of the CSI Saddle Pad Flex-Plate®.
Shims may or may not be necessary for shoulder pockets.

Uneven Development
Horses are right or left handed (leaded), just like us, and this can cause one side of the shoulder to be larger than the other. Horses tend to be more dominant on the left side, which is often exacerbated with certain western disciplines (such as roping) when horses spend more time loping on their left leads than on their right. Another cause is from frequent saddle adjustment by the rider causing irritation on one side of the horse.
However it occurs, uneven development causes uneven saddle fit. The CSI Saddle Pad can benefit any horses with uneven development. But, depending on the severity, uneven development may or may not need a shim for extra support.

Sway Back
Sway back is a condition often found in older horses where the alignment of the back behinds to drop. This sway can cause bridging issues with the saddle where the tree contacts only behind the wither and over the loin and not properly down the center of the horse’s back. This misconnection can cause all kinds of issues from soreness to resistance.
Horses with sway back issues can be easily helped with the CSI Saddle Pad and a shim!
If your horse does have a sway backed, it is a good idea to do latisimus dorsi muscle exercises to help them strengthen their top-line. One exercises is to “tickle” the horse under the belly (by applying pressure in the belly button area) until you see the top-line lift. Ask the horse to hold the lift for several seconds for maximum effect.
Watch this video to learn more exercises to help strengthen your horses back muscles.
Need a saddle pad fit consult? We’re happy to help
We will happily provide a free phone consult with one of our saddle pad fitters to help you access saddle fit and saddle pad fit both before and after buying a CSI Saddle Pad.
To give you the most effective advice, you should be prepared to take some digital photos and email them to us at csisaddlepads@gmail.com
Here is a list of photos we like to see to evaluate saddle and/or saddle pad fit (To get good relevant photos, place the horse on level ground in an even stance.):
- A photo of the horse’s back with no saddle or pad. One from each side.
- One photo looking down the horse’s back from behind and above. Use a bucket or the fence to help get a good angle where we can determine if the horse is even or uneven behind the wither.
- Two photos of the horse with just the saddle, not cinched. One from the mount side and one looking down the gullet from the front.
Download a handy PDF of how to take the photo, click here